Reviews, updates and in depth guides to your favourite mobile games - AppGamer.com
|
Tutorials
Image Tinting Technique for Colorizing
Oct 18th 2005
|
Tint Images With A Specific Color:
|
 |
1.
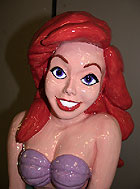
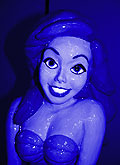
Ariel
This is an image of part of a sculpture I created for my daughter, who loves Disney's "Little Mermaid," among other things. And here you thought I was only talented with Photoshop. Not So! Okay, perhaps I went a little overboard on the chest, but hey- Mr. Photoshop's only human.
Anyway, I reviewed a question from a teamphotshop.com visitor wanting to colorize an image with a specific color. In their case, they wanted images tinted to match a web page background color.
Yes, it can easily be done. I'll show you how. |

|
2.
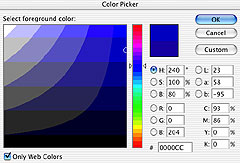
Pick A Color...
... any color. In the case I was referring to, it was a WWW color with a specific hexidecimal numeric value. Click on your foreground color (near the bottom of the tool palette) to bring up the Color Picker.
In the image to the left, you can see that I checked the Only Web Colors option. Then I simply typed in the hexidecimal value of the color I wanted. It was "0000CC" - see if you can find it near the bottom-middle of the image. As soon as I typed in those six characters, the color picker jumped to that particular shade of blue. I click OK, and my new foreground color is now OOOOCC - a medium blue. |
|
|
|
|
3.
Colorize
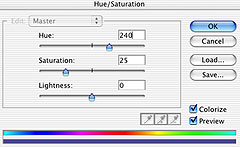
Now comes the fun part- Tinting, or Colorizing, the image. Choose Image: Adjust: Hue/Saturation... to bring up the Hue/Saturation control window you see at left.
As soon as I check the Colorize option (see it in the lower right of the window,) Photoshop tints the image based on that foreground color I picked in Step 2 above.
You can see at the bottom of the Hue/Saturation window the bottom vertical bar of color. If you're wondering why it looks kind of pale & violet-shifted, it's because the Saturation control is turned down by default. I'll fix that in the next step, but at left you can see how my image has been affected. All of the original color information has been thrown away only the value information (the lights & darks) is preserved, and the image is tinted bluish. It's the same as if the original image would have been grayscale instead of color. |

|
4.
Saturation
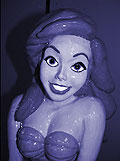
To get your image's tint to more closely match your chosen color (in this case, "0000CC") keep a close eye on you foreground color (which is still the pure medium blue- "0000CC") and move the Saturation slider towards the right.
You'll have to just trust your eyesight and judge when you think the image closely matches the tint you wanted. I found in my case that around a Saturation value of "72" the image looked pretty close to the Blue that I had originally chosen. I clicked OK and you can see at left how my image turned out. |

|
5.
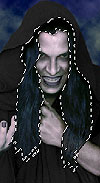
Wizard Hair
It's that simple. We're basically done here, but I also wanted to point out to you that this technique also works on portions of an image. You don't have to colorize the entire image.
I first discovered the ability to tint with a specific color years ago when I was working on some hair. I wanted to change the hair color to a color I had chosen. Here's how to do it:
The image at left is one that I'm working on for a massive tutorial coming soon. I have a selection of the hair-only saved, so I'm using this one to illustrate how to colorize. After I load the selection, It looks as you see at lower-left- with the marquee surrounding the hair of this nefarious individual. |

 |
6.
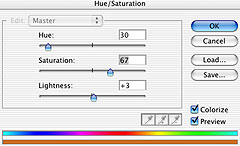
Colorize Again
You know enough to take it from here I think. Once the selection was loaded, I can easily colorize the hair by first picking a color I like, then going to the old reliable Hue/Saturation controls. Blue and Orange are like opposites (they're called Complimentary Colors) so I picked a semi-pale Orange-Yellow hue, since I had several shades of blue in the background. Then I went to Image: Adjust: Hue/Saturation... and moved the Saturation slider until I thought the hair looked okay. |
 |
7.
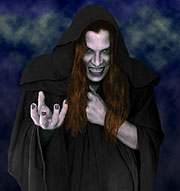
Only Your Hairdresser Knows
So here's the result. Since I had a selection active, only the selected area, the hair, was affected by my colorizing. Now go and "colour your world." |
|
|
Latest Forums Clone YourselfThat is quit nice. But I think that can be more easy to do.. |
|
|
