Reviews, updates and in depth guides to your favourite mobile games - AppGamer.com
|
Tutorials
Creating Visual Action: Using History Palette & Brush
Oct 18th 2005
|
Creating Visual Action: Using History Palette & Brush:
|

|
1.
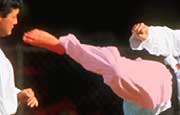
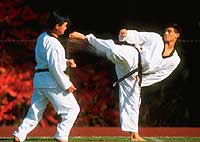
We're going to take this
photo of these two karate guys and jazz it up a bit by adding a little sense of action, or motion.
There's at least three ways to do this, via the motion blur; using multiple layers with varying
transparency settings; and the focus of this tutorial, using the History Palette and History
Brush.
The History Palette has been around since 5.0, and is perhaps best explained as the "multiple undo" palette. Anything you do to a document alters it's state. The History Palette stores at least the previous 20 states of your document. Older states are automatically deleted to free up memory for Photoshop. (You can increase the numbers of steps the History Palette "remembers", though this will hog up more of the free space on your scratch disc. In 6.0, you enter the number of history states in the general preferences. Previous to 6.0, this setting was found in the palette's command menu under History Options.) States are added from the top down. (The oldest state is at the top of the list, the most recent one at the bottom.) Each state is listed with the name of the tool or command used to change the image. To return to a previous state of your file, all you have to do is click on it in the palette.
Another option to keep a particular state from being deleted is to make a snapshot of the state. Snapshots appear at the top of the palette. One is automatically created when the document is opened, functioning the same as the old "revert to saved" command if you click on it.
Once you close and reopen the document, all states and snapshots from the last working session are cleared from the palette. |
|
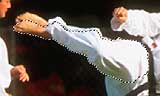
2.
What I want to do to this
image is make the leg that the guy is kicking look as if its moving fast. Using the Quick Mask Mode, I make a selection of the leg. |
|
|
|
3.
Here I've copied and
pasted my selection on a new layer above the original image (I've turned off the background image
temporarily.)
|
|
4.
I'm planning on making
the leg look as if it's swinging upward, so more of the motion is going to be visible near the toes.
To have the blurring effect I'm going to do blend in neatly near where the leg is attached to the
body, I use a layer mask and the Linear Gradient tool and the Linear Gradient tool  to make the thigh gradually become transparent. to make the thigh gradually become transparent.
|
 |
5.
Now that the boring
selection work is done we can get on to the fun part, making this leg look as if it's moving. I'm
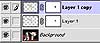
going to need an unaltered version of this layer with the leg on it, so I duplicate the layer first,
as you can see in my layers palette over there on the left. The work I'm going to next is going to
take place on the middle layer (called "layer 1" in this case.)
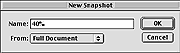
To begin making the motion effect, I use Edit: Transform: Rotate to change the angle and position of the leg on layer 1 (I've turned off, or "hidden" the uppermost layer, "Layer 1 copy" so that I can see what I'm doing.) I angle the leg down slightly to the position it might be in if we were watching a film in reverse, a few frames earlier. I'm going to repeat this process a few times to create a full blur effect, but for now a little change in position is enough and I choose New Snapshot... from the History Palette's command menu (the little triangle in the upper right of the palette.) I name this one 40%.
 |
|
6.
Now that last "state" is saved as a snapshot so I go on and rotate and reposition the leg a little further. I make another snapshot and name it "30%." We're kind of working backwards here, moving the leg a little further away from its original position with each transformation (this is just one possible approach to the problem.) I repeat the process of transforming the angle and position of the leg and snap shotting it two more times. |
|
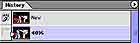
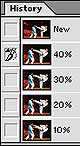
7.
Take a look at the top of
my history palette now. You can see I moved the leg a total of four times and each time gave the
snapshot created a name of a percentage. The names involve the opacity which I'm going to use the
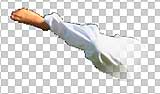
History Brush at to "paint" in the motion effect. Here's my options bar before I paint in the first stroke: at to "paint" in the motion effect. Here's my options bar before I paint in the first stroke:  The history brush is set at 40% opacity and (in the image to the left) I've defined a source for my history brush by clicking in the box next to the "40%" snapshot. Now I paint in the leg from that snapshot state at 40% opacity (or so). After I've done that, I set the source for the brush as the "30%" snapshot and paint that in at around 30% opacity. Next I select the "20%" state and paint that one in... and so on. I paint in the motion effect, lowering the opacity of the leg the farther it is from its original position. The history brush is set at 40% opacity and (in the image to the left) I've defined a source for my history brush by clicking in the box next to the "40%" snapshot. Now I paint in the leg from that snapshot state at 40% opacity (or so). After I've done that, I set the source for the brush as the "30%" snapshot and paint that in at around 30% opacity. Next I select the "20%" state and paint that one in... and so on. I paint in the motion effect, lowering the opacity of the leg the farther it is from its original position. |
 |
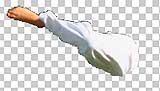
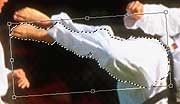
8.
Here's the result: Though
I might fine-tune this considerably if it were for a professional job, what we got is a pretty
respectable blur effect that makes it look like that leg means business and that other guy is about to
get busted in the face pretty good. (Note that I've turned back on that top layer- the one that
contained the selection of the leg in its original position.) |
 |
9.
Here's a tiny version of
the whole picture. Bruce Lee would be proud.
Actually, prior to kicking my ass, he'd probably point out that I got the angle of the leg wrong. But I'm no Grand Master, I just wanted to give my photo a sense of action and that's what I did.
There's always more than one approach to a job when you're using Photoshop. Be sure to check out the companion tutorials to this one to see other ways to achieve this effect. |
|
|
Latest Forums Clone YourselfThat is quit nice. But I think that can be more easy to do.. |
|
|
