Tutorials
Blend images with a layer mask
Oct 18th 2005
|
Blend Images With A Layer Mask:
|
 |
1.
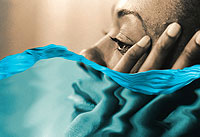
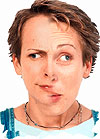
Anti-Matter Man
AAAHH!!
Who is this freak?
The product of genetic mutation?
A man exposed to one too many Gamma rays?
Victim of one of those late-night infomercial face creams?
No, the answer is much simpler than all of those. He's the subject matter of an image subjected to about two minutes of digital manipulation in that amazing application, Adobe Photoshop.
Wanna learn how it's done? Read On! |
  
|
2.
How It's Done
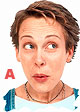
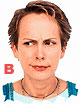
Okay, it's real simple. I took image A, admittedly a strange photo, and duplicated the layer. This duplicate was then the victim of the Poster Edges Filter and the Invert command and is labeled image B. Then I added on a Layer Mask and filled it with the Gradient Tool  . This mask is labeled image C and below them all you can see how it looked on my Layers Palette (were only concerned with the top two layers). . This mask is labeled image C and below them all you can see how it looked on my Layers Palette (were only concerned with the top two layers).
That's it! If you've got it, there's no need to read on. Go back to your homes. There's nothing more to see here.
But if you'd like a greater level of enlightenment, join me below as I explain layer masks a bit more in depth and laboriously show you exactly the steps needed to smoothly blend two images together. |
|
|
|
|
3.
Get More Info
Though I'll be confined to one task here, the use of Layer Masking comes up in many other tutorials. Check these out for many other possibilities:
• In Photo Vignettes I make extensive use of masks to show how to put some very cool borders around those cherished photos of yours.
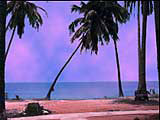
• Layer Masks have a close relationship with Alpha Channels. In Using Channels To Make Selections I explain channels as well as using masks. I altered the sky, beach, and water in the image to the left.
• In Running Liquid Effect and Underwater Effect on a Photo (among many others) I show how to make a mask and blur it in order to blend different elements of an image seamlessly.
• In Creating A Mask: Face you'll see a closely-related shortcut to layer masks called Quick Mask Mode. I use this to get a great selection of an image. |
|
4.
Back To Business
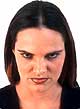
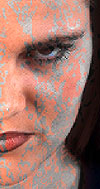
Let me show you a couple of variations on the methods I used to create Anti-Matter Man above. To start with in this first one, I found these two similar photos of a woman showing us different expressions. I though I'd try to put two halves of each image together, making a composite. There's a few ways to do this, and one of the quickest doesn't involve having to make any selections; just use a Layer Mask.
I took Photo B and copied it, then pasted it above image A. You can see A is a little larger, and I'll have to deal with that in a minute. After pasting Photo A, I clicked the Add a mask icon  at the bottom of the Layers Palette. (In Photoshop 7.0 & later the default name of this icon is Add Layer Mask or Add Vector Mask, depending on the type of layer you have.) at the bottom of the Layers Palette. (In Photoshop 7.0 & later the default name of this icon is Add Layer Mask or Add Vector Mask, depending on the type of layer you have.) |
|
5.
Gradient
Now I had a layer mask, but right after you hit the button it's set to reveal everything unless you have a selection active. So I was still seeing Photo B, until I picked the Gradient Tool and did a short horizontal linear gradient across the middle of my image. Because the Mask was active, (notice the black outline around it's thumbnail icon here; click on either the icon for the mask or the image to work on whichever you need) 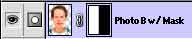
the gradient filled the layer mask, not the image itself.
Here's how it works: Layer masks use the value of the grayscale pixels you put into them to decide whether to hide or show the image on the layer they're attached to. Fill the mask with black, and nothing on that layer will be seen. Whatever layers are beneath it in the stacking order will now be visible. Fill the layer mask with white, and you'll see the entire image on the layer it's attached to. It's as if the mask isn't there at all. Fill a mask with gray, and only part of the image on the layer the mask affects will be visible. It will be just like turning down the transparency of the layer (how transparent the layer becomes depends on how gray the mask is.)
A quick way to remember how the values work on masks is:
Black Conceals; White Reveals
Anyway, now you can understand why my image looks as it does there at left. |
 |
6.
Hiding The Seam
You saw how our images matched up above. Not so good. The first thing I need to do is scale down image A so it fits with B better. I went down to that layer and chose Edit: Transform: Scale and shrunk image A up until the chins met nicely. I was still left with a little nose problem:
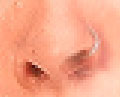
I went back up to the photo B layer and clicked on the mask icon (so I'd be working on the mask, not the image) and picked the Paintbrush tool  . With White as my foreground color, I just "painted" the nose from photo B back in. . With White as my foreground color, I just "painted" the nose from photo B back in. |
 |
7.
Finish It Up
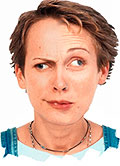
You probably noticed that I also had a problem with the woman's neck & clothes. I took the paintbrush & revealed the area in question for photo B, and added a mask & hid the shoulders for photo A (I had to paint with black to do that.) Over to the left there, you can see what the final image and it's mask looked like.
At bottom left, you can see how the layers palette looked. We're really only concerned with the top two layers. The other two are the color I wanted behind them, and the original photo A. I named the layers to help tell you what they are. |
|
8.
One More!
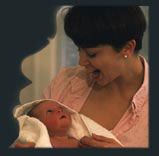
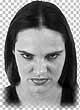
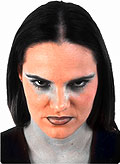
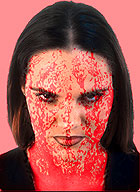
One of the reasons I made this tutorial was a question I got as Mr. Photoshop asking how to make an image blend smoothly from grayscale to color right down the middle. It's a simple thing to do, but a long thing to explain. You now know how to blend the images together. Here's how to turn an image grayscale:
I made a duplicate layer of this intense looking female first. Choose Image: Adjustments: Hue/Saturation... and you'll see this dialog box:
Just crank the Saturation slider all the way to the left (-100) and you'll lower the color intensity to the point of nonexistence. |
 |
9.
Anti-Cosmetics
I made another copy of the original color photo and put it above the grayscale version. Next I added a mask and started painting with black. Well, mostly black. I lowered the opacity of the brush in a few places where I wanted a smoother transition.
At left, you can see me how the image turned out. Below it, I've shown you how the mask looked (to view your mask in the main image window, Option/Alt-Click on the mask's thumbnail icon. To undo this view, click again.
I think you've got it by now, but here's what my layers palette looked like after all this:
 |
 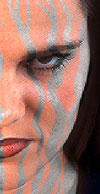 |
10.
Do-Over
Right after completing that last one, I thought of something much cooler to do. I got rid of the mask in step 9 (one way to do this is click on the mask thumbnail icon and drag it down to the trash can at the bottom of the layers palette. Click Discard when you're asked whether you want to apply the mask or not. Applying it would permanently alter the pixels on the image.) Next, I attached another mask to the top layer:
Then I got my paintbrush back and began painting black lines onto the image. Since the mask was active, instead of seeing lines of black appear, my strokes of paint concealed the color image and revealed the grayscale layer below. My mask looked like this:
 |
 |
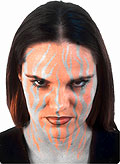
11.
Glass Filter
Another thing you can do to grayscale pixels of a layer mask is apply one or more filters to it. I picked Filter: Distort: Glass and saw the dialog box at left. My image then looked like this:
 |
 |
12.
Some Tips
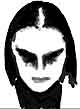
Having another idea, I couldn't stop there. I went to the grayscale image layer and chose Image: Adjustments: Hue/Saturation... again. This time I checked the Colorize box in the Hue/Saturation Dialog and moved the Hue, Saturation, and Lightness sliders until I got the red you see at left.
I don't think I'd date this woman.
Here are some last minute tips:
• Command/Control-Click the layer mask thumbnail icon to load a selection of the unmasked areas of the image (the white part of the mask.)
• Shift-Alt/Option-Click the layer mask thumbnail icon to view a semi-transparent "rubylith" representation of the mask in the main image window. This is like being in Quick Mask Mode.
• Shift-Click the layer mask thumbnail icon to temporarily disable the mask. This hides the mask's effect in the main image window. |
|
|
Latest Forums Clone YourselfThat is quit nice. But I think that can be more easy to do.. |
